

It is no secret that Eliot Coleman is a huge advocate of soil blockers and recommends using them wholeheartedly.
We, as new market farmers, look for guidance from the experts who have successfully started a market garden and continue to grow beautiful, delicious veggies.
So, it should be no surprise that we turned to the wise Eliot Coleman when it came to deciding how we start our seedlings.
We chose to use soil blockers for our first year (at least) because of cost and curiosity. Both Jon and I are really interested in soil blocks for their simplicity, lack of plastic use, and we just really wanted to see them in action.
This article is for those who are also curious about soil blockers and how they work.
Much of the information in this article comes from Eliot Coleman’s The New Organic Grower.
If this topic interests you and/or you plan on starting a market farm in the future, be sure to include Eliot’s book on your must-read list!
How Soil Blocks Work
A soil block is a block made out of lightly compressed potting soil.
It serves as both the container and the growing medium for a transplant seedling.
The blocks are composed entirely of potting soil and have no walls, as such.
Because they are pressed out by a form rather than filled into a form, air spaces provide the walls.
Instead of the roots circling as they do upon reaching the wall of a container, they fill the block to the edges and wait.
The air spaces between the blocks and the slight wall glazing caused by the block form keep the roots from growing from one block to another.
The edge roots remain ready for rapid outward growth.
When transplanted into the field, the seedling quickly becomes established.
If the plants are kept too long in the blocks, however, the roots do extend into the neighbouring blocks, so the plants should be transplanted before this happens.
Despite being no more than a cube of growing medium, a soil block is not fragile.
When first made, it is bound together by the fibrous nature of the moist ingredients.
Once seeded, the roots of the young plant quickly fill the block and ensure its stability even when handled roughly
Soil blocks are the answer for a farm-produced seeding system that costs no more than the ‘soil’ of which it is composed.
Advantages of Using Soil Blocks
The best thing about the soil-block system is that everything that can be done in small pots, trays, or plugs can be done in blocks without the expense and bother of a container.
Blocks can be made to accommodate any need.
The block may have a small depression on the top in which a seed is planted, but blocks can also be made with a large hole in which to transplant seedlings.
They can also be made with a hole precisely the size of a smaller block, so seedlings started in a germination chamber in small blocks can be quickly transplanted into larger blocks.
Blocks provide the modular advantages of plug trays without the problems and expense of a plug system.
Blocks free the grower from the mountains of plastic containers that have become so synonymous in horticultural operations.
Eliot Coleman believes that soil blocks are the best system for growing seedlings.
Soil Blockers
The key to this system is the tool for making soil blocks, the soil block maker or ‘blocker.’
Essentially, it is an ejection mold that forms self-contained cubes out of a growing medium.
Both hand and machine models are available. For small-scale farming, hand-operated soil blockers are perfectly adequate.
There are two features to understand about the blocker in order to appreciate the versatility of soil blocks:
- The size of the block form
- The size and shape of the center pin
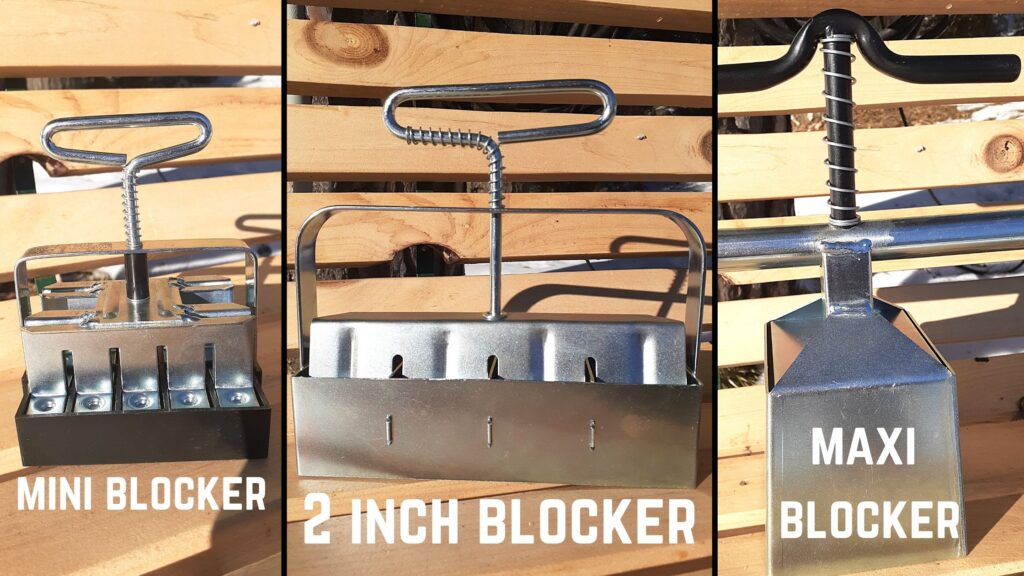
The Form
Forms are available to make ¾” blocks (the mini-blocker), 1 ½” blocks, 2” blocks, 3” blocks, and 4” blocks (the maxi blocker).
The block shape is cubic rather than tapered.
Two factors influence the choice of block size:
- The type of plant
- The length of the intended growing period prior to transplanting
For example, a larger block would be used for early sowings or when planting outside is likely to be delayed.
A smaller block would suffice for short duration propagation in summer and fall.
The mini block is only used as the germination block for starting seedlings.
The smaller the block, the less potting mix, and greenhouse space are required. A 1 1/2 inch block contains less than half the volume of a 2-inch block.
When choosing between block sizes, the larger of the two is usually the safer choice. However, if a smaller block size is used, the plants can always be held for a shorter time.
Eliot prefers to always go for the larger block, first because he believes it is false economy to stint on the care of young plants. Their vigorous early growth is the foundation for later product productivity.
Secondly, he prefers not to rely on soluble feeding when the total nutrient package can be enclosed in the block from the start.
All that is necessary when using the right block size and soil mix is to water the seedlings.
Another factor justifying any extra volume of growing medium is the addition of organic matter to the soil.
If lettuce is grown in 2-inch blocks and set out at a spacing of 12 x 12 inches, the amount of organic material in the blocks is the equivalent of applying 5 tons of compost per acre.
Since peat is more than twice as valuable as manure for increasing long-term organic matter in the soil, the blocks are actually worth double their weight in manure.
Where succession crops are grown, the soil improving material added from transplanting alone can be substantial.
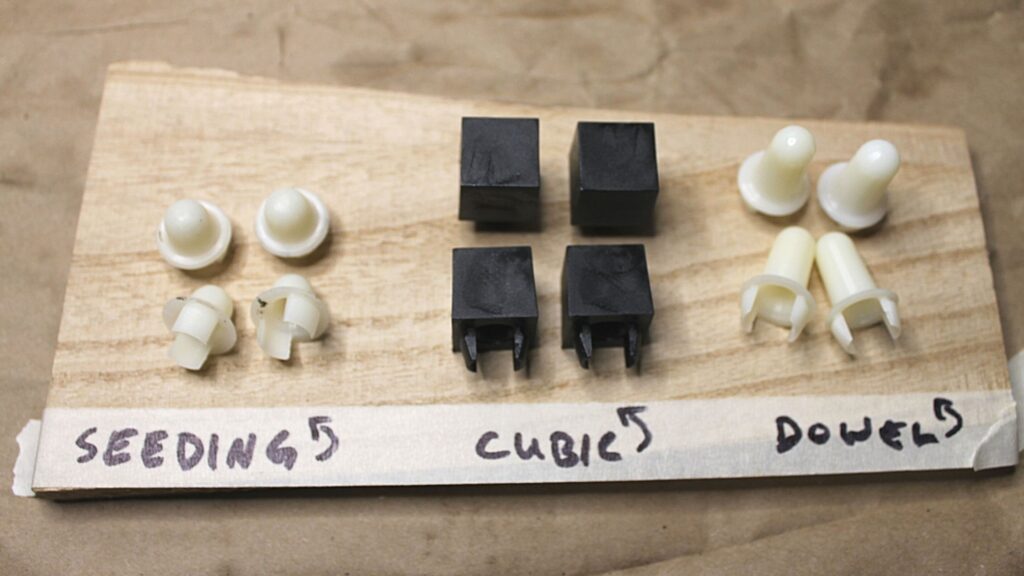
The Pin
The pin is the object mounted in the centre of the top press form plate.
The standard seed pin is a small button that makes an indentation for the seed on the top of the soil block.
This pin is suitable for crops with seeds the size of lettuce, cabbage, onion, or tomato. Other pin types are dowel or cube-shaped.
Cubic pins are used so a seedling in a smaller block can be potted up to a larger block; the pin makes a cubic hole in the top of the block into which the smaller block is placed.
Eliot uses cubic pins for melon, squash, corn, peas, beans, and any other seeds of those dimensions.
A long dowel pin is used to make a deeper hole into which cuttings can be inserted.
The different types of pins are easily interchangeable.
Blocking Systems
The ¾” block made with the mini blocker is used for starting seeds.

With this small block, enormous quantities of modular seedling can be germinated on a heating pad or in a germination chamber. This is especially useful for seeds that take a long time to germinate because a minimum space is used in the process.
Mini blocks are effective because they can be handled as soon as you want to pot on the seedlings.
The sooner young seedlings are potted on, the better their eventual growth will be.
The 1 ½” block is used for short-duration transplants of standard crops such as lettuce and brassicas. It is also used as the seed block for cucumbers, melons, and artichokes by using a large seed pin.
The 2” block is the standard for longer-duration transplants.

When fitted with a ¾” cubic pin, it is used for germinating beans, peas, corn, or squash seeds and for the initial potting on of crops started in mini blocks.
The 3” block fitted with a ¾” cubic pin offers the option to germinate many different field crops such as squash, corn, cucumber, and melon when greenhouse space is not critical.
It is also an ideal size for potting on asparagus seedlings started in mini blocks.
The 4” block fitted with a 1 ½” or 2” cubic pin is the final home of the artichoke, eggplant, pepper, and tomato seedlings.
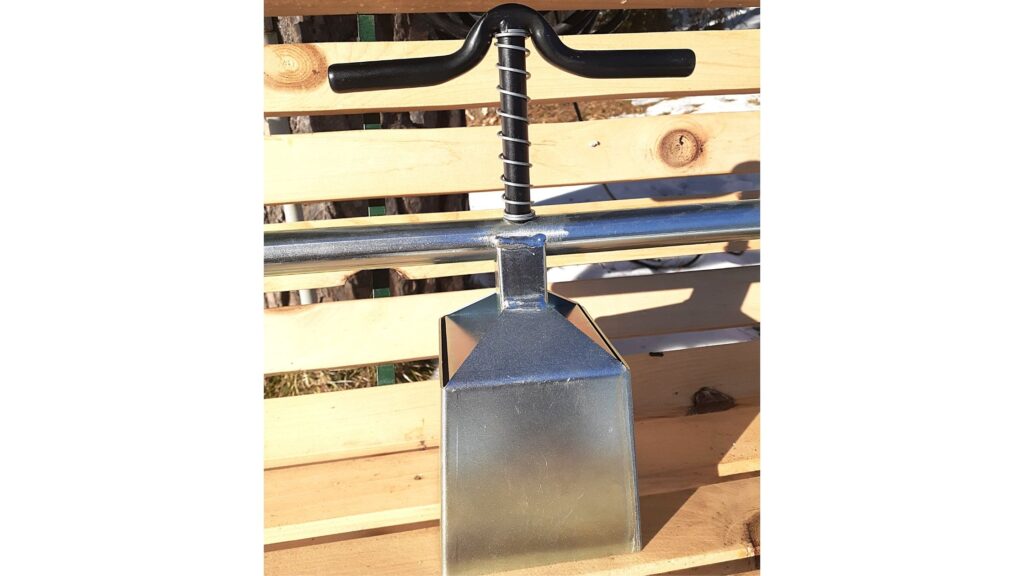
Because of its cubic shape, it has the same soil volume as a 6” pot and can grow exceptional plants of these crops to their five to eight-week field transplant age.
In Summary
If you are looking to reduce your plastic use as well as cost, you might want to consider using soil blockers to start your seedlings.
A word of warning, there is a bit of a learning curve when it comes to actually making the blocks, as I experienced when we started making ours. But as with most things in life, you will get better with practice.
Eliot also recommends using a specific soil blocking mix for making the soil blocks so they do not become compacted. We outlined the step-by-step method here if you want to check it out.
Overall, we are pretty happy with how our soil blockers and how our soil blocks are coming along. It has been a couple of weeks since started our seedlings, and we have some growth happening, so not too shabby!
This is a learning process for us as first-time market farmers, so I am not going to judge us too harshly just yet.
The important thing is to keep learning and improving our techniques. There is no better way to do that than to just practice, practice, practice!
Do you use soil blockers to start your seedlings? Let us know in the comments below.
Stay Local,
Kathy & Jon
Your Friendly Neighbourhood Growers
0 Comments